Tutorial#
Step 1. Prepare Task and Metrics#
Create a Task#
Note
Only Organization managers can create tasks.
To add a new Task, go to the Tasks page and click the Add button to set up and profile the Task you'd like to manage.

When creating a new Task in Kiroframe, specify: Task name, key, description, owner, and tracked metrics.

Note
Please note that the task key is an immutable value and is used inside the init command.
Note
If your organization does not have metrics, block “Metrics“ will be empty. You can always add them to the task later (see Assign Metrics to the Task).
Create Metrics#
Note
Only Organization managers can create metrics.
To add a new Metric, go to the Metrics page and click the Add button.
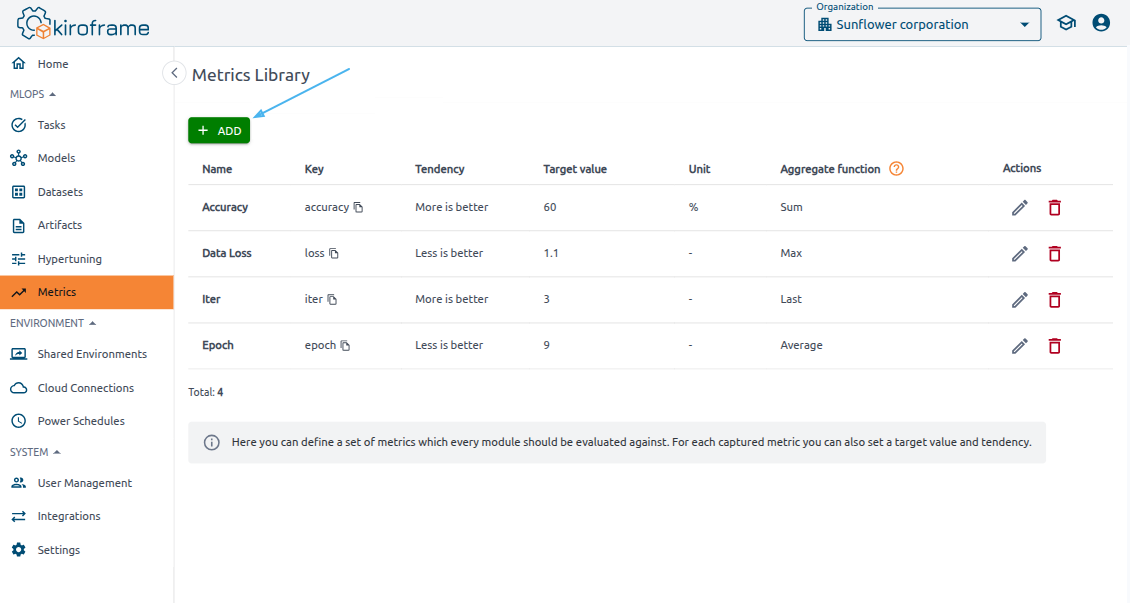
When adding a Metric in Kiroframe, you need to specify the following details:
- Name: The name that displays in the interface.
-
Key: A unique metric identifier, used in commands like send.
-
Tendency: Choose either “Less is better” or “More is better” to define the desired trend.
- Target value: The target value you aim to achieve for this metric.
- Unit: A measurement indicator that displays on charts or in other areas where the metric appears.
- Aggregate function: This function applies if multiple values are recorded for the metric within the same second.
Note
The key is an immutable value.
These settings help ensure that metrics are tracked consistently and accurately across your tasks and runs.
Assign Metrics to the Task#
To assign a metric to a Task in Kiroframe:
1. Open the Task by going to the Tasks page and clicking on the Task name
2. Click the Configure button
3. Select the Metrics tab
4. Add the desired metrics.
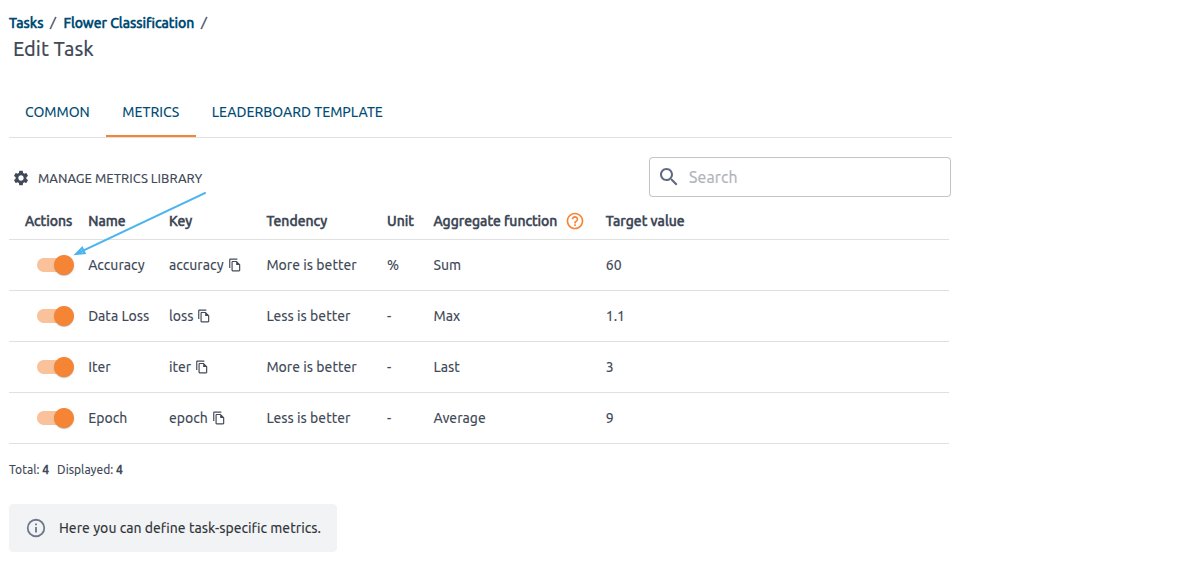
This allows you to configure and assign specific metrics to the Task for tracking and analysis.
Step 2. Integrate your training code with Kiroframe#
Note
Please note that the command parameter values and file references in the examples might be fictitious. Use your own values and references.
Install 'kiroframe_arcee'#
The kiroframe_arcee is a Python package which integrates ML tasks with Kiroframe by automatically collecting executor metadata from the cloud and processing stats.
It requires Python 3.8+ to run. You can install kiroframe_arcee from PyPI on the instance where the training will occur. If it's not already installed, use:
pip install kiroframe-arcee
This setup ensures that kiroframe_arcee can collect and report relevant metrics and metadata during ML tasks.
Commands and examples#
Find examples of specialized code prepared by our team at the https://github.com/hystax/kiroframe_arcee/tree/main/examples.
To view all available commands:
1. Go to the Tasks page of the MLOps section of the menu
2. Click the Task name you want to run
3. Click the Profiling Integration button of the opened page.
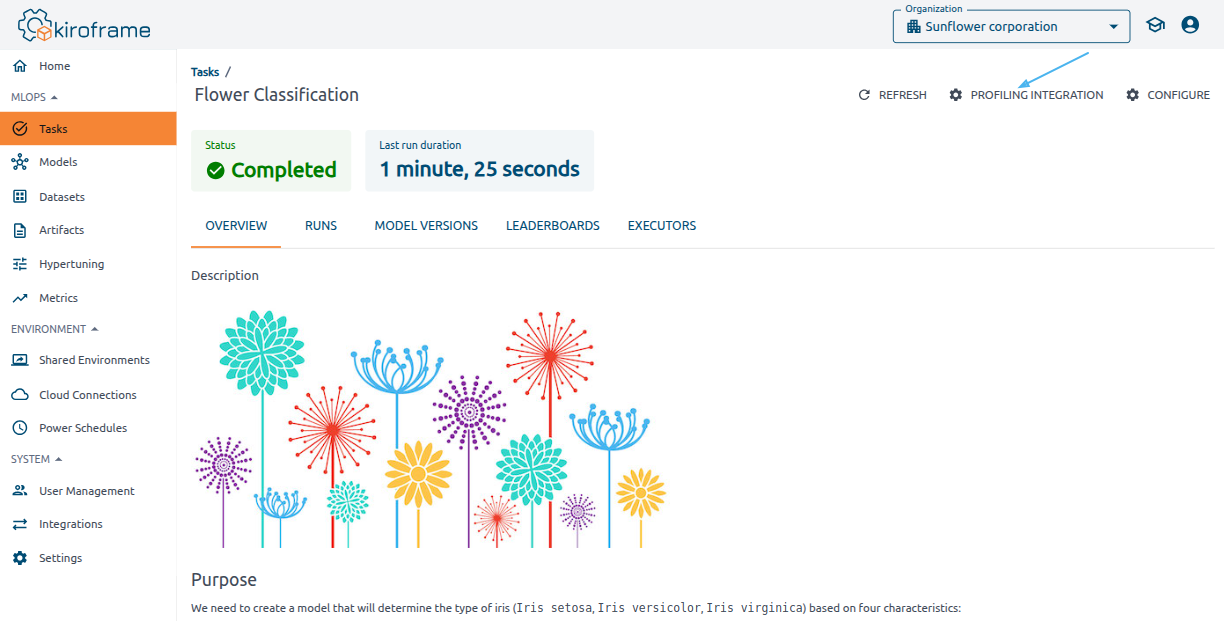
The Profiling Integration side modal provides a comprehensive list of commands available for profiling and integration with Kiroframe.
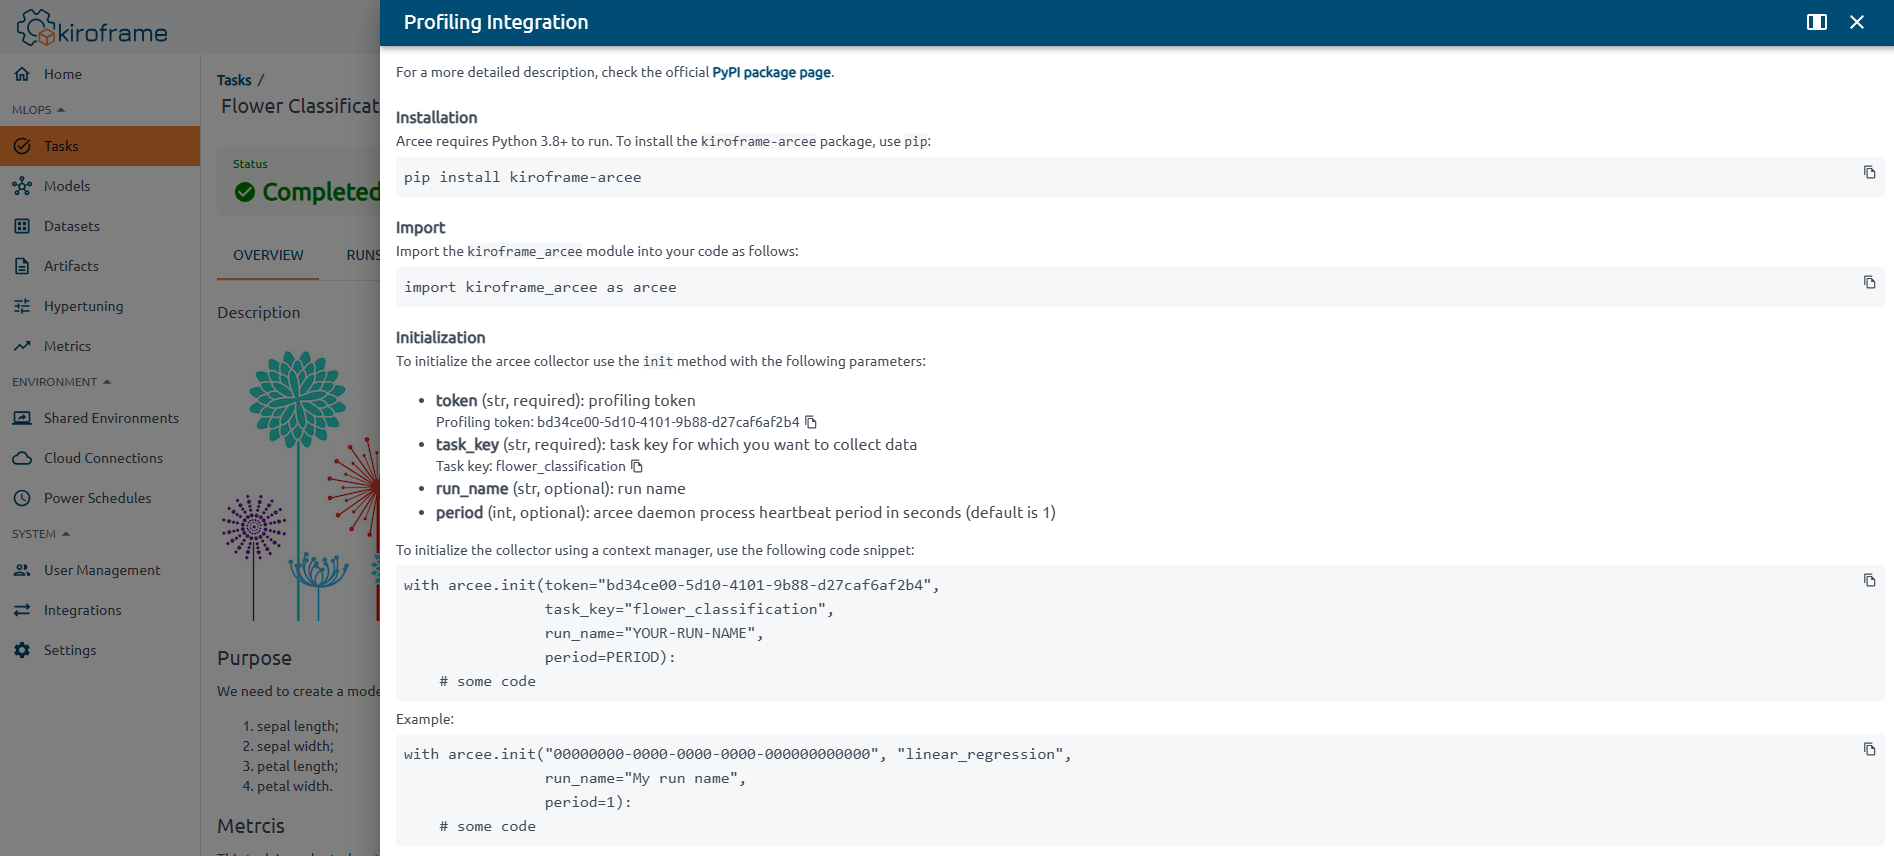
Please pay special attention to the import and initialization commands. They are required.
Import#
Note
This command is required.
Import the kiroframe_arcee module into your training code as follows:
import kiroframe_arcee as arcee
Initialization#
Note
This command is required.
To initialize an kiroframe_arcee collector, you need to provide both a profiling token
and a task key for which you want to collect data. This ensures that the data collected is
associated with the correct Task and can be accurately monitored and analyzed in Kiroframe.
The profiling token is shared across the organization, meaning it is common to all users and tasks within that organization. The task key is specified when creating a Task.
Find the profiling token and task key in the Profiling Integration side modal. To access it, click the task name in the list on the Tasks page, then click the Profiling Integration button.
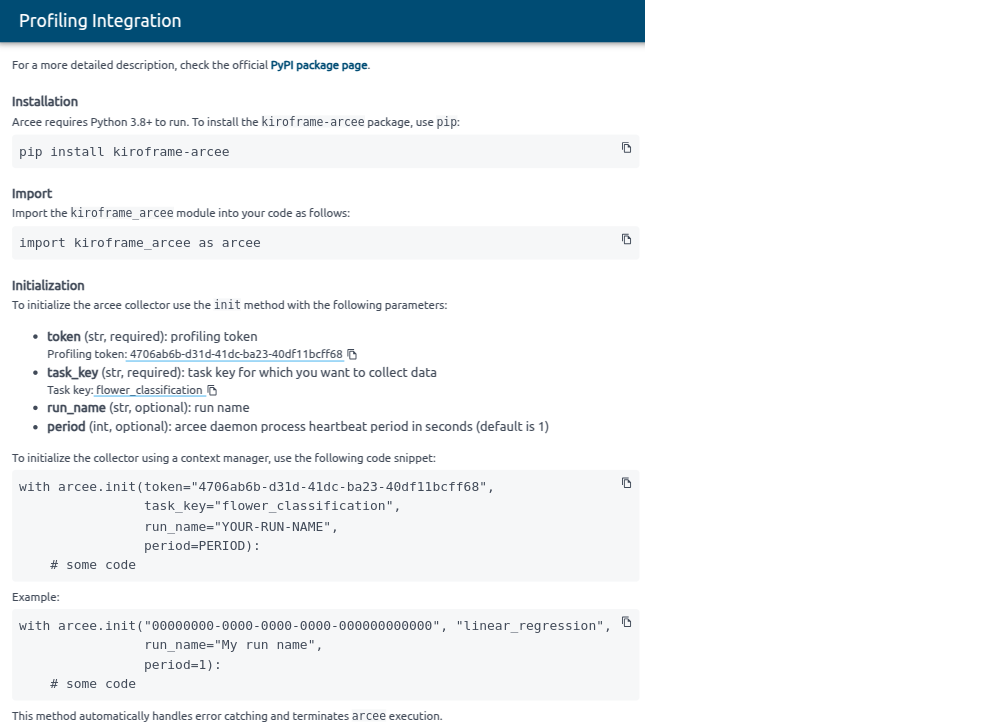
To initialize the arcee collector use the init method with the following parameters:
-
token (str, required): the profiling token.
-
task_key (str, required): the task key for which you want to collect data.
-
run_name (str, optional): the run name.
-
period (int, optional): arcee daemon process heartbeat period in seconds (default is 1).
To initialize the collector using a context manager, use the following code snippet:
with arcee.init(token="YOUR-PROFILING-TOKEN",
                task_key="YOUR-TASK-KEY",
                run_name="YOUR-RUN-NAME",
                period=PERIOD):
    # some code
Examples:
with arcee.init("00000000-0000-0000-0000-000000000000", "linear_regression",
                run_name="My run name", period=1):
    # some code
This method automatically handles error catching and terminates arcee execution.
Alternatively, to get more control over error catching and execution finishing, you can initialize the collector using a corresponding method. Note that this method will require you to manually handle errors or terminate arcee execution using the error and finish methods.
arcee.init(token="YOUR-PROFILING-TOKEN", task_key="YOUR-TASK-KEY")
# some code
arcee.finish()
# or in case of error
arcee.error()
Send metrics#
To send metrics, use the send method with the following parameter:
- data (dict, required): a dictionary of metric names and their respective values (note that metric data values should be numeric).
arcee.send({"YOUR-METRIC-1-KEY": YOUR_METRIC_1_VALUE, "YOUR-METRIC-2-KEY": YOUR_METRIC_2_VALUE})
Example:
# Import the kiroframe_arcee module
import kiroframe_arcee as arcee

# Initialize the collector using a context manager
with arcee.init("YOUR-PROFILING-TOKEN", "YOUR-TASK-KEY"):
  # Send metric
  arcee.send({ "accuracy": 71.44, "loss": 0.37 })
Note
In the interface you will see only those metrics that are attached to the task (details can be found How to assign Metrics to the Task).
Finish Task run#
To finish a run, use the finish method
arcee.finish()
Fail Task run#
To fail a run, use the error method
arcee.error()
Execute instrumented training code#
Run your script with the command:
python training_code.py
If the script runs successfully, the corresponding run will appear with a Running status under the associated Task in Kiroframe.
This indicates that kiroframe_arcee is actively tracking and sending metrics during execution.
Step 3. Extended settings. Commands and examples#
Add Hyperparameters#
To add hyperparameters, use the hyperparam method with the following parameters:
- key (str, required): the hyperparameter name.
- value (str | number, required): the hyperparameter value.
arcee.hyperparam(key="YOUR-PARAM-KEY", value=YOUR_PARAM_VALUE)
Note
Unlike metrics, hyperparameters do not need to be created first.
Example:
# Import the kiroframe_arcee module
import kiroframe_arcee as arcee

# Initialize the collector using a context manager
with arcee.init("YOUR-PROFILING-TOKEN", "YOUR-TASK-KEY"):
  # Add hyperparam
  arcee.hyperparam("epochs", 10)
Tag a Task Run#
To tag a run, use the tag method with the following parameters:
- key (str, required): the tag name.
- value (str | number, required): the tag value.
arcee.tag(key="YOUR-TAG-KEY", value=YOUR_TAG_VALUE)
Example:
# Import the kiroframe_arcee module
import kiroframe_arcee as arcee

# Initialize the collector using a context manager
with arcee.init("YOUR-PROFILING-TOKEN", "YOUR-TASK-KEY"):
  # Add run tags
  arcee.tag("purpose", "testing")
  arcee.tag("code_commit", "commit_id")
Add a Milestone#
To add a milestone, use the milestone method with the following parameter:
- name (str, required): the milestone name.
arcee.milestone(name="YOUR-MILESTONE-NAME")
Example:
# Import the kiroframe_arcee module
import kiroframe_arcee as arcee

# Initialize the collector using a context manager
with arcee.init("YOUR-PROFILING-TOKEN", "YOUR-TASK-KEY"):
    # Download training data
    # Add milestone with name "Download training data"
    arcee.milestone("Download training data")
    ...
    # Download test data
    # Add milestone with name "Download test data"
    arcee.milestone("Download test data")
    ...
Add a Stage#
To add a stage, use the stage method with the following parameter:
- name (str, required): the stage name.
arcee.stage(name="YOUR-STAGE-NAME")
Example:
# Import the kiroframe_arcee module
import kiroframe_arcee as arcee
...
# Initialize the collector using a context manager
with arcee.init("YOUR-PROFILING-TOKEN", "YOUR-TASK-KEY"):
    # Download training data
    # Add stage with name "preparing"
    arcee.stage("preparing")
    ...
Datasets#
Create a new Dataset#
There are two ways how to add a Dataset: using kiroframe_arcee or Kiroframe interface. Use this tip as a guide to add a Dataset with the Kiroframe interface.
To create a new Dataset kiroframe_arcee, use the Dataset class with the following parameters:
- key (str, required): the unique Dataset key.
- name (str, optional): the Dataset name.
- description (str, optional): the Dataset description.
- labels (list, optional): the Dataset labels.
Version parameters:
- aliases (list, optional): the list of aliases for this version.
- meta (dict, optional): the Dataset version meta.
- timespan_from (int, optional): the Dataset version timespan from.
- timespan_to (int, optional): the Dataset version timespan to.
dataset = arcee.Dataset(key='YOUR-DATASET-KEY',
                        name='YOUR-DATASET-NAME',
                        description="YOUR-DATASET-DESCRIPTION",
                        ...
                        )
dataset.labels = ["YOUR-DATASET-LABEL-1", "YOUR-DATASET-LABEL-2"]
dataset.aliases = ['YOUR-VERSION-ALIAS']
Find key:version pair#
The key:version pair uses in the kiroframe_arcee methods.
Go to the Datasets menu. Find key:version of the latest version under the Latest version column of the table.

The list of other key:version pairs can be found on the Dataset’s page: click on the Dataset → Version column.
Log a Dataset#
To log a Dataset, use the log_dataset method with the following parameters:
- dataset (Dataset, required): the Dataset object.
- comment (str, optional): the usage comment.
arcee.log_dataset(dataset=dataset, comment='LOGGING_COMMENT')
If you want to log the Dataset created via Kiroframe interface, use the use_dataset method before the log_dataset method.
dataset = arcee.use_dataset(
    dataset='YOUR-DATASET-KEY:YOUR-DATASET-VERSION-OR-ALIAS')

# actions with dataset

arcee.log_dataset(dataset, "Add new files")
Use a Dataset#
To use an existing Dataset version, use the use_dataset method with the key:version format with the following parameters:
- dataset (str, required): the Dataset identifier in
key:versionformat. Read here how to find thekey:versionpair in Kiroframe. - comment (str, optional): a usage comment.
arcee.use_dataset(
    dataset='YOUR-DATASET-KEY:YOUR-DATASET-VERSION-OR-ALIAS')
Use Cases#
Log a new Dataset#
To create and log the initial version of a new Dataset, follow the steps:
1. Create an object of the Dataset class, add Version parameters.
2. Add files to the created Dataset. Find details at the README file on github.
3. Log the Dataset using the log_dataset method.
After that the Dataset appears in Kiroframe.
Example:
dataset = arcee.Dataset(
    key='YOUR-DATASET-KEY',
    name='YOUR-DATASET-NAME',
    description="YOUR-DATASET-DESCRIPTION",
    ...
)
dataset.labels = ["YOUR-DATASET-LABEL-1", "YOUR-DATASET-LABEL-2"]
dataset.aliases = ['YOUR-VERSION-ALIAS']

#S3
os.environ['AWS_ACCESS_KEY_ID'] = 'AWS_ACCESS_KEY_ID'
os.environ['AWS_SECRET_ACCESS_KEY'] = 'AWS_SECRET_ACCESS_KEY'
dataset.add_file(path='s3://BUCKET/PATH_2')

dataset.add_file(path='file://LOCAL_PATH_TO_FILE_2')

arcee.log_dataset(dataset=dataset)
Log a New Dataset Version#
1. Retrieve the latest (or desired) Dataset version using use_dataset.
2. Add, remove, or modify files using the commands from the Adding files and downloading section.
3. Log the new Dataset version using the log_dataset method.
Example:
dataset = arcee.use_dataset(
    dataset='YOUR-DATASET-KEY:YOUR-DATASET-VERSION-OR-ALIAS')
#actions with dataset
arcee.log_dataset(dataset=dataset, comment='LOGGING_COMMENT')
Note
If no files have been changed, a new Dataset version will not be logged.
Create Models and set additional Model parameters#
Use this tip as a guide to add a model with the Kiroframe interface.
To create a model, use the model method with the following parameters:
-
key (str, required): the unique model key.
-
path (str, optional): the run model path.
arcee.model(key="YOUR-MODEL-KEY", path="YOUR-MODEL-PATH")
Example:
arcee.model("my_model", "/home/user/my_model")
Set additional parameters for the Model#
Model versioning#
To set a custom model version, use the model_version method with the following parameter:
- version (str, required): the version name.
arcee.model_version(version="YOUR-MODEL-VERSION")
Model version alias#
Model version aliases allow you to assign a mutable, named reference to a particular version of a registered model. Each alias should be unique within the model’s scope. If an alias is already in use, it should be reassigned.
To set a model version alias, use the model_version_alias method with the following parameter:
- alias (str, required): the alias name.
arcee.model_version_alias(alias="YOUR-MODEL-VERSION-ALIAS")
Tagging#
To add tags to a model version, use the model_version_tag method with the following parameters:
- key (str, required): the tag name.
- value (str | number, required): the tag value.
arcee.model_version_tag(key="YOUR-MODEL-VERSION-TAG-KEY", value=YOUR_MODEL_VERSION_TAG_VALUE)
Example:
# Import the kiroframe_arcee module
import kiroframe_arcee as arcee

# Initialize the collector using a context manager
with arcee.init("YOUR-PROFILING-TOKEN", "YOUR-TASK-KEY"):
  # Create “Iris model prod“ model version
  arcee.model("iris_model_prod", "https://s3.amazonaws.com/ml-bucket/flowers_231021.pkl")
  # Set custom version name
  arcee.model_version("My custom version")
  # Set model verion alias
  arcee.model_version_alias("winner")
  # Set model verion tag
  arcee.model_version_tag("env", "staging")
Create Artifacts#
To create an artifact, use the artifact method with the following parameters:
- path (str, required): the run artifact path.
- name (str, optional): the artifact name.
- description (str, optional): the artifact description.
- tags (dict, optional): the artifact tags.
arcee.artifact(path="YOUR-ARTIFACT-PATH",
               name="YOUR-ARTIFACT-NAME",
               description="YOUR-ARTIFACT-DESCRIPTION",
               tags={"YOUR-ARTIFACT-TAG-KEY": YOUR_ARTIFACT_TAG_VALUE})
Example:
# Import the kiroframe_arcee module
import kiroframe_arcee as arcee

# Initialize the collector using a context manager
with arcee.init("YOUR-PROFILING-TOKEN", "YOUR-TASK-KEY"):
#Create Accuracy line chart artifact
arcee.artifact("https://s3/ml-bucket/artifacts/AccuracyChart.png",
               name="Accuracy line chart",
               description="The dependence of accuracy on the time",
               tags={"env": "staging"})
Set Artifact tag#
To add a tag to an artifact, use the artifact_tag method with the following parameters:
- path (str, required): the run artifact path.
- key (str, required): the tag name.
- value (str | number, required): the tag value.
arcee.artifact_tag(path="YOUR-ARTIFACT-PATH",
                   key="YOUR-ARTIFACT-TAG-KEY",
                   value=YOUR_ARTIFACT_TAG_VALUE)
Example:
# Import the kiroframe_arcee module
import kiroframe_arcee as arcee

# Initialize the collector using a context manager
with arcee.init("YOUR-PROFILING-TOKEN", "YOUR-TASK-KEY"):
  # Add artifact tag
  arcee.artifact_tag("https://s3/ml-bucket/artifacts/AccuracyChart.png",
                   "env", "staging demo")