AWS#
Root account – Data Export already configured#
Kiroframe supports the AWS Organizations service that allows linking several cloud connections in order to centrally manage data. The Root account (payer) is the only one having access to collective data. When registering this type of profile in Kiroframe, the user is given an option for Data Exports to be detected automatically.
Case 1: Credentials and Data Export belong to one account#
Configure policies and user#
1. Configure Data Exports. Having Data Exports configured for your cloud account is the main prerequisite in order to proceed with the remaining actions. If Data Export hasn't been configured, refer to the Root Account – Data Export not configured yet instruction.
2. Update bucket policy:
- Navigate to the Permissions tab of your AWS S3 bucket → select Bucket Policy.
-
Click Edit → insert a JSON code snippet:
{ "Version":"2012-10-17", "Statement":[ { "Sid":"EnableAWSDataExportsToWriteToS3AndCheckPolicy", "Effect":"Allow", "Principal":{ "Service":[ "billingreports.amazonaws.com", "bcm-data-exports.amazonaws.com" ] }, "Action":[ "s3:PutObject", "s3:GetBucketPolicy" ], "Resource":[ "arn:aws:s3:::<bucket_name>/*", "arn:aws:s3:::<bucket_name>" ], "Condition":{ "StringLike":{ "aws:SourceAccount":"<AWS account ID>", "aws:SourceArn":[ "arn:aws:cur:us-east-1:<AWS account ID>:definition/*", "arn:aws:bcm-data-exports:us-east-1:<AWS account ID>:export/*" ] } } } ] } -
Replace
<bucket_name>with the name of the bucket. - Replace
<AWS account ID>with the AWS Account ID (12 digits without “-”). - Save.
3. Create user policies for Discover Resources and ReadOnly access.
-
ReadOnly access:
-
Follow steps 1–5 of the instructions.
-
Insert the JSON code in the Type or paste a JSON policy document step:
{ "Version":"2012-10-17", "Statement":[ { "Sid":"ReportDefinition", "Effect":"Allow", "Action":[ "cur:DescribeReportDefinitions" ], "Resource":"*" }, { "Sid":"GetObject", "Effect":"Allow", "Action":[ "s3:GetObject" ], "Resource":"arn:aws:s3:::<bucket_name>/*" }, { "Sid":"BucketOperations", "Effect":"Allow", "Action":[ "s3:ListBucket", "s3:GetBucketLocation" ], "Resource":"arn:aws:s3:::<bucket_name>" } ] } -
Replace
<bucket_name>with the name of the bucket created on the previous step.
-
-
Discover Resources:
-
Include the following policy to allow Kiroframe to parse EC2 resource data. Follow steps 1-5 of the instructions.
-
Insert the JSON code on the Type or paste a JSON policy document step:
{
    "Version": "2012-10-17",
    "Statement": [
        {
            "Sid": "KiroframeOperations",
            "Effect": "Allow",
            "Action": [
                "s3:GetBucketPublicAccessBlock",
                "s3:GetBucketPolicyStatus",
                "s3:GetBucketTagging",
                "iam:GetAccessKeyLastUsed",
                "cloudwatch:GetMetricStatistics",
                "s3:GetBucketAcl",
                "ec2:Describe*",
                "s3:ListAllMyBuckets",
                "iam:ListUsers",
                "s3:GetBucketLocation",
                "iam:GetLoginProfile",
                "cur:DescribeReportDefinitions",
                "iam:ListAccessKeys",
                "elasticloadbalancing:Describe*"
            ],
            "Resource": "*"
        }
    ]
}
-
4. Create user and grant policies:
-
Go to Identity and Access Management (IAM) → Users → create a new user.
-
In Step 2. Set permissions, select Attach policies directly → attach the policies created earlier.
-
Confirm the creation of the user.
5. Create access key:
-
Go to Identity and Access Management (IAM) → Users → select the created user → create an access key
-
Download the .csv file with Access key and Secret access key.
Connect to Kiroframe#
Once the user is configured, add the cloud connection to Kiroframe.
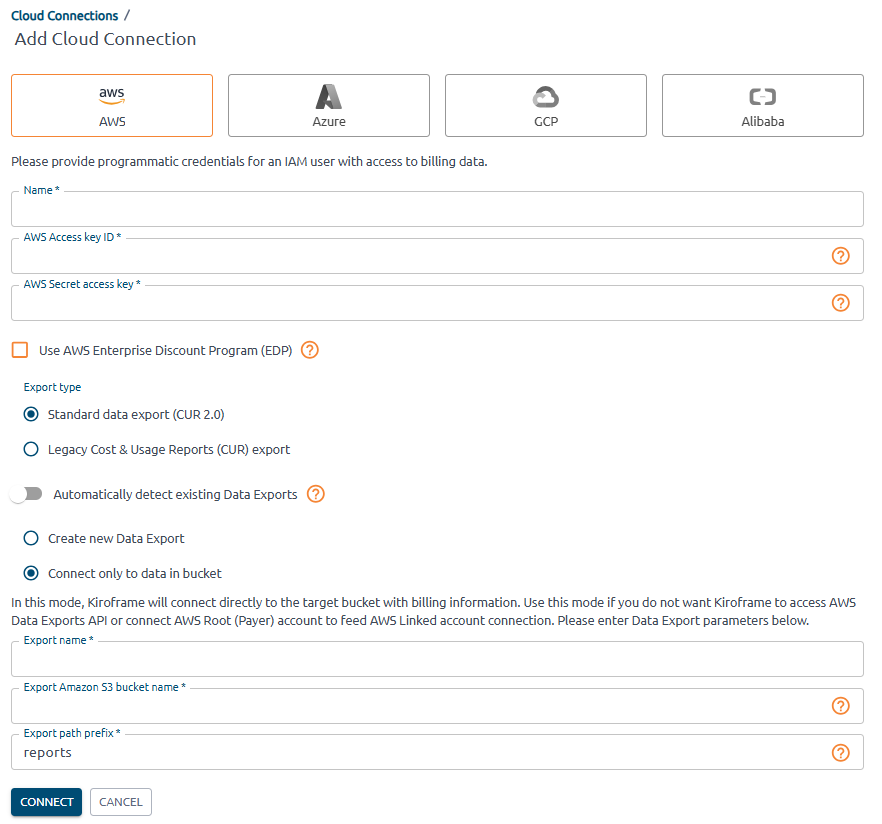
- Go to Kiroframe → Cloud connections in the ENVIRONMENT section of the menu → click the Add button → select AWS.
-
Fill in the fields:
- Provide user credentials: AWS Access key ID → Access key, AWS Secret access key → Access key secret.
- Select Export type as in the report configured earlier: AWS Billing and Cost Management → Data Exports → find the report configured earlier → export type.
- Switch off Automatically detect existing Data Exports.
- Select Connect only to data in bucket.
-
Provide Data Export parameters:
- Export Name: find at AWS Billing and Cost Management → Data Exports table → Export name column.
-
Export Amazon S3 Bucket Name: find at AWS Billing and Cost Management → Data Exports table → S3 bucket column.
-
Export path prefix: find at AWS Billing and Cost Management → Data Exports table → click on Export name → Edit → Data export storage settings → S3 destination → last folder name(without “/”). Example, S3 destination: s3://aqa-bill-bucket/report-cur2, enter report-cur2 into the field.
Attention
Wait for the export to be generated by AWS and uploaded to Kiroframe according to the schedule (which is performed on an hourly basis).
Please contact our Support Team at support@hystax.com if you have any questions regarding the described configuration flow.
Case 2: Credentials and Data Export belong to different accounts#
This case applies when credentials for Account1 are used to create a cloud connection in Kiroframe, but the data export bucket is located in Account2.
Note
AWS requires permissions in both the bucket policy and the user policy to enable bucket access.
Note
The created cloud account gets expenses for Account1 only.
Configure policies and user#
1. Configure Data Exports. Having Data Exports configured for your cloud account is the main prerequisite in order to proceed with the remaining actions. If Data Export hasn't been configured, refer to the Root Account – Data Export not configured yet instruction.
2. Create user:
-
Go to Identity and Access Management (IAM) → Users → create a new user.
-
Confirm the creation of the user.
3. Create user policies for Discover Resources and ReadOnly access.
-
ReadOnly access:
-
Follow steps 1–5 of the instructions.
-
Insert the JSON code in the Type or paste a JSON policy document step:
{ "Version": "2012-10-17", "Statement": [ { "Sid": "KiroframeBucketReadOnly", "Effect": "Allow", "Principal": { "AWS": "arn:aws:iam::<AWS account1 ID>:user/<your_user>" }, "Action":[ "s3:ListBucket", "s3:GetBucketLocation", "s3:GetObject" ], "Resource": [ "arn:aws:s3:::<bucket_name>/*", "arn:aws:s3:::<bucket_name>" ] } ] } -
Replace
<AWS account1 ID>with the AWS Account1 ID (12 digits without “-”). - Replace
<your_user>with the user created on step 3. - Replace
<bucket_name>with the name of the bucket created on the previous step.
-
-
Discover Resources:
-
Include the following policy to allow Kiroframe to parse EC2 resource data. Follow steps 1-5 of the instructions.
-
Insert the JSON code on the Type or paste a JSON policy document step:
{
    "Version": "2012-10-17",
    "Statement": [
        {
            "Sid": "KiroframeOperations",
            "Effect": "Allow",
            "Action": [
                "s3:GetBucketPublicAccessBlock",
                "s3:GetBucketPolicyStatus",
                "s3:GetBucketTagging",
                "iam:GetAccessKeyLastUsed",
                "cloudwatch:GetMetricStatistics",
                "s3:GetBucketAcl",
                "ec2:Describe*",
                "s3:ListAllMyBuckets",
                "iam:ListUsers",
                "s3:GetBucketLocation",
                "iam:GetLoginProfile",
                "cur:DescribeReportDefinitions",
                "iam:ListAccessKeys",
                "elasticloadbalancing:Describe*"
            ],
            "Resource": "*"
        }
    ]
}
-
Select the user, select Attach policies directly → attach the policies created.
4. Update bucket policy:
- Navigate to the Permissions tab of your AWS S3 bucket → select Bucket Policy.
-
Click Edit → insert a JSON code snippet:
{ "Version": "2012-10-17", "Statement": [ { "Sid": "KiroframeBucketActionsAllow", "Effect": "Allow", "Principal": { "AWS": "arn:aws:iam::<AWS account1 ID>:user/<your_user>" }, "Action":[ "s3:ListBucket", "s3:GetBucketLocation", "s3:GetObject" ], "Resource": [ "arn:aws:s3:::<bucket_name>/*", "arn:aws:s3:::<bucket_name>" ] } ] } -
Replace
<AWS_account1_ID>with the AWS Account1 ID (12 digits without “-”). - Replace
<your_user>with the user created on step 2. - Replace
<bucket_name>with the name of the bucket. - Save.
5. Create access key:
-
Go to Identity and Access Management (IAM) → Users → select the created user → create an access key
-
Download the .csv file with Access key and Secret access key.
Connect to Kiroframe#
Once the user is configured, add the cloud connection to Kiroframe.
- Go to Kiroframe → Cloud connections in the ENVIRONMENT section of the menu → click the Add button → select AWS.
-
Fill in the fields:
- Provide user credentials: AWS Access key ID → Access key, AWS Secret access key → Access key secret.
- Select Export type as in the report configured earlier: AWS Billing and Cost Management → Data Exports → find the report configured earlier → export type.
- Switch off Automatically detect existing Data Exports.
- Select Connect only to data in bucket.
-
Provide Data Export parameters:
- Export Name: find at AWS Billing and Cost Management → Data Exports table → Export name column.
-
Export Amazon S3 Bucket Name: find at AWS Billing and Cost Management → Data Exports table → S3 bucket column.
-
Export path prefix: find at AWS Billing and Cost Management → Data Exports table → click on Export name → Edit → Data export storage settings → S3 destination → last folder name(without “/”). Example, S3 destination: s3://aqa-bill-bucket/report-cur2, enter report-cur2 into the field.
Attention
Wait for the export to be generated by AWS and uploaded to Kiroframe according to the schedule (which is performed on an hourly basis).
Please contact our Support Team at support@hystax.com if you have any questions regarding the described configuration flow.
Root account – Data Export not configured yet#
Kiroframe supports the AWS Organizations service that allows linking several Cloud Connections in order to centrally manage data of multiple users. The Root account (payer) is the only one having access to collective data. When registering this type of profile in Kiroframe, the user is given an option for Data Exports to be created automatically.
Warning
When you connect the root account but do not connect the linked accounts, all data from the unconnected linked accounts is ignored, even if it exists in the data export file. To retrieve data from both linked and root accounts, connect all AWS accounts (not just the root). Kiroframe ignores data from unconnected linked accounts.
Configure policies and user#
1. Create user policy for bucket and export creation access.
-
Go to Identity and Access Management (IAM) → Policies.
-
Create a new policy for fully automatic configuration (both bucket and export are created):
-
Follow steps 1-5 of the instructions.
-
Insert the JSON code on the Type or paste a JSON policy document step:
{ "Version":"2012-10-17", "Statement":[ { "Sid":"ReportDefinition", "Effect":"Allow", "Action":[ "cur:DescribeReportDefinitions", "cur:PutReportDefinition" ], "Resource":"*" }, { "Sid":"CreateCurExportsInDataExports", "Effect":"Allow", "Action":[ "bcm-data-exports:ListExports", "bcm-data-exports:GetExport", "bcm-data-exports:CreateExport" ], "Resource":"*" }, { "Sid":"CreateBucket", "Effect":"Allow", "Action":[ "s3:CreateBucket" ], "Resource":"*" }, { "Sid":"GetObject", "Effect":"Allow", "Action":[ "s3:GetObject" ], "Resource":"arn:aws:s3:::<bucket_name>/*" }, { "Sid":"BucketOperations", "Effect":"Allow", "Action":[ "s3:PutBucketPolicy", "s3:ListBucket", "s3:GetBucketLocation" ], "Resource":"arn:aws:s3:::<bucket_name>" } ] } -
Replace
<bucket_name>with the name of the bucket.
-
-
Discover Resources:
-
Include the following policy to allow Kiroframe to parse EC2 resource data. Follow steps 1-5 of the instructions.
-
Insert the JSON code on the Type or paste a JSON policy document step:
{
    "Version": "2012-10-17",
    "Statement": [
        {
            "Sid": "KiroframeOperations",
            "Effect": "Allow",
            "Action": [
                "s3:GetBucketPublicAccessBlock",
                "s3:GetBucketPolicyStatus",
                "s3:GetBucketTagging",
                "iam:GetAccessKeyLastUsed",
                "cloudwatch:GetMetricStatistics",
                "s3:GetBucketAcl",
                "ec2:Describe*",
                "s3:ListAllMyBuckets",
                "iam:ListUsers",
                "s3:GetBucketLocation",
                "iam:GetLoginProfile",
                "cur:DescribeReportDefinitions",
                "iam:ListAccessKeys",
                "elasticloadbalancing:Describe*"
            ],
            "Resource": "*"
        }
    ]
}
-
2. Create user and grant policies:
-
Go to Identity and Access Management (IAM) → Users → create a new user.
-
In Step 2. Set permissions, select Attach policies directly → attach the policies created earlier.
-
Confirm the creation of the user.
3. Create access key:
-
Go to Identity and Access Management (IAM) → Users → select the created user → create an access key
-
Download the .csv file with Access key and Secret access key.
Connect to Kiroframe#
Once the user is configured, add the cloud connection to Kiroframe.
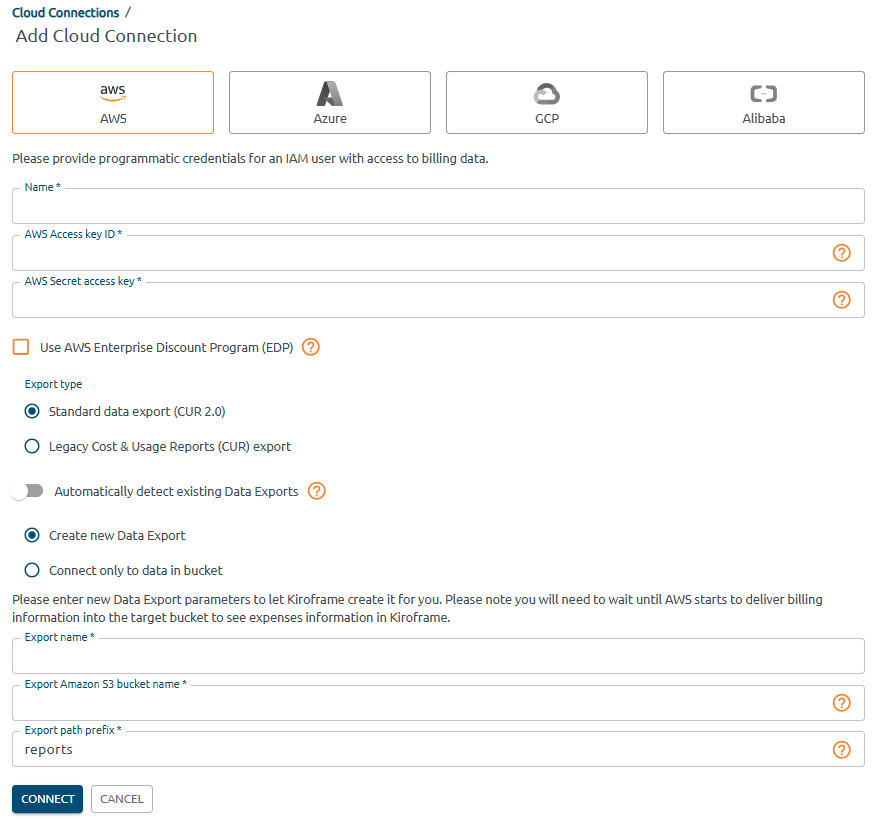
- Go to Kiroframe → Cloud connections in the ENVIRONMENT section of the menu → click the Add button → select AWS → choose the Root connection type.
-
Fill in the fields:
- Provide user credentials: AWS Access key ID → Access key, AWS Secret access key → Access key secret.
- Select Export type as in the report configured earlier: AWS Billing and Cost Management → Data Exports → find the report configured earlier → export type.
- Switch off Automatically detect existing Data Exports.
- Select Create new Data Export.
-
Provide Data Export parameters:
- Export Name: enter a new name for the data export.
-
Export Amazon S3 Bucket Name: find at AWS Billing and Cost Management → Data Exports table → S3 bucket column.
-
Export path prefix: enter a new export path prefix that you want to prepend to the names of your report files.
Note
Specify the bucket in the 'Export S3 Bucket Name' field if it already exists. Kiroframe then creates the report and store it in the bucket using the specified prefix.
-
Click Connect when done.
-
Wait for AWS to generate the export and upload it to Kiroframe according to the schedule (approximately one day).
Warning
AWS updates or creates a new export file once a day. If the export file is not placed in the specified bucket under the specified prefix, the export fails with an error.

Root account – Create Standard Data Export / Legacy CUR Export#
Note
Creating a data export is only available for the Root cloud account (payer), while all its Linked accounts are centrally managed and receive their data through the main account's invoice.
In order to utilize automatic / manual data import in Kiroframe, first, create a Data Export in AWS. Please refer to their official documentation to become acquainted with the guidelines for Data Exports.
-
Navigate to AWS Billing & Cost Management → Data Exports.
-
Create a new data export:
-
Standard:
1. Select Standard data export as the export type.
2. Enter the export name.
3. Select CUR 2.0 → select the Include resource IDs checkbox → choose the time granularity for how you want the line items in the export to be aggregated.
4. Select Overwrite existing data export file → choose the compression type.
5. Set the data export storage setting:
- Create a new or use an existing bucket for the export.
- Enter the S3 path prefix that you want prepended to the name of your data export.
6. Confirm export creation. Data export is prepared by AWS within 24 hours.
-
Legacy CUR Export:
1. Select Legacy CUR export (CUR) as the export type.
2. Enter the export name.
3. Select the Include resource IDs and Refresh automatically checkboxes.
4. Set the data export delivery options:
-
Choose the time granularity for how you want the line items in the export to be aggregated.
-
Sekect Overwrite existing report.
-
Choose the compression type.
5. Set the data export storage setting:
-
Create a new bucket or use an existing one for the export.
-
Enter the S3 path prefix that you want prepended to the name of your data export.
6. Confirm export creation. Data export is prepared by AWS within 24 hours
-
-
When it's done, follow the steps from the section Root account – Data Export already configured